Phase 2 - Clarifications & Staging
This phase ensures all technical and business requirements are clarified before development begins.
Technical Clarifications
Entra Integration Setup
- SCIM integration task division
- Enterprise Application registration
- User provisioning workflow
- Access management configuration
Integration User Configuration
- Permission scope definition
- Access level documentation
- User role assignment
- Security protocol establishment
Azure DMZ Security Proxy
- Technical documentation handover
- Container deployment specifications
- TEST environment setup
- PROD environment setup
- Container configuration requirements
- Security protocol implementation
Sandbox Environment
- Development resource access
- Package installation verification
- Integration testing setup
- UAT environment preparation
Business Clarifications
General Settings
- Branch operating hours configuration
- Meeting booking time constraints
- Daily meeting capacity limits
- System-wide defaults
Meeting Configuration
Types and Categories
- Online meeting setup
- Physical meeting requirements
- Phone meeting configuration
- Other meeting type specifications
- Meeting type prioritization rules
Time Management
- Meeting duration by theme
- Pre/post processing time allocation
- Booking window restrictions
- Time gap requirements
- Buffer time configuration
Location Management
Physical Locations
- Location mapping strategy
- Room booking system integration
- Creation/deletion procedures
- Room identification standards
- Location status management
Employee Assignment
- Department mapping
- Location-based assignments
- Global vs. local advisor setup
- Resource allocation rules
Employee Configuration
- System access assignments
- Unique identifier management
- Alias name configuration
- Onboarding/offboarding procedures
Management UI Configuration
Initial Setup
- Default value configuration
- Meeting taxonomy creation
- Customer category setup
- Meeting configuration completion
- Room usage parameter definition
Validation
- Configuration testing
- User access verification
- Integration point validation
- Workflow testing
Success Criteria
- Technical Setup
- All integrations configured
- Security measures implemented
- Access controls established
- Test environment operational
- Business Configuration
- Meeting types defined
- Location mapping completed
- Employee setup finalized
- Workflows documented
- Documentation
- Technical specifications complete
- Configuration guides created
- User procedures documented
- Support processes established
layout: default title: Phase 2 - Technical Setup Guide description: Technical and business clarifications phase nav_order: 3 parent: Implementation Guide —
Detailed task description for Phase 2 – Clarifications & staging (technical clarifications)
Salesforce Package Installation
&bookme – Scheduler is a solution that is delivered via Salesforce AppExchange packages and can be easily installed. The &bookme - Scheduler package consists of a project package and a dependency on an internal &money package. Dependencies must currently be installed before the primary project package, according to AppExchange guidelines. Deployment is thus divided into 2 steps:
- Installation of the &money Component package
- Installation of the &bookme project package.
The creation of the integration user has the following requirements:
| Field | Value |
|---|---|
| License | Salesforce |
| usPermission set assignments | Booking platform – integration |
Depending on the security setup in the environment, it may be required that &money’s backend IP is whitelisted in the integration user’s profile (See provided data sheet).
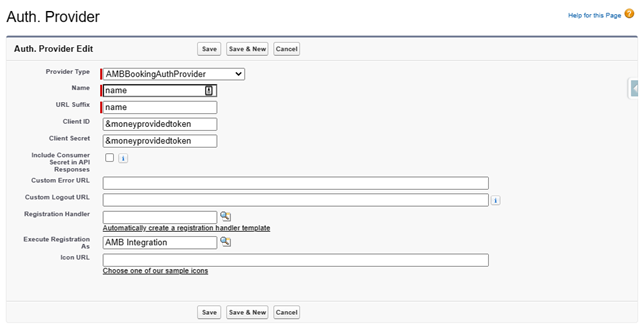
Create auth. Provider
Create an auth. provider for outgoing calls to &bookme – Scheduler backend.
| Field | Value |
|---|---|
| License | Salesforce |
| usPermission set assignments | Booking platform – integration |
| Name | AMBAuthProvider |
| URL suffix | BookingAuthProvider |
| Client Id | See the data sheet provided. |
| Client Secret | See the data sheet provided. |
| Execute Registration | Insert the integration user created in the section “Creating an integration user in the deployment environment” |
| Include Consumer Secret in API Responses | False |
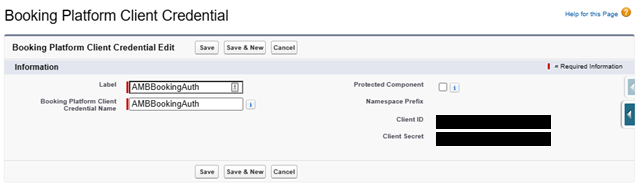
Verify booking platform client credential metadata
Check that a custom metadata record has now been created in “Booking Platform Client Credentials”.
| Field | Value |
|---|---|
| Name | AMBBookingAuth |
| Client Id | See the data sheet provided |
| Client Secret | See the data sheet provided |
| URL | See the data sheet provided |
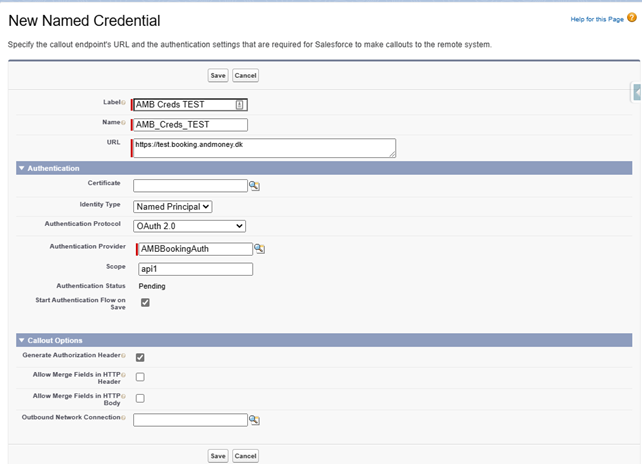
Create named credentials
Create a set of named credentials for the &money booking backend
| Field | Value |
|---|---|
| URL | See the data sheet provided |
| Name | BookingEngine |
| Identity Type | Named Principal |
| Authentication provider | AMBBookingAuth |
| Scope | API1 |
| Start Authentication Flow on Save | True |
| Generate Authorization Header | True |
Salesforce connected app to event integration
- Create a Connected App in Salesforce Orgen with Oauth flow (see Connected app guide.pdf)
- Preauthorize Booking platform – Integration permission set
- Save Consumer Key and Consumer Secret and transfer them to &money together with the integration username
- Add &money backend IP range to “Trusted IP Range for OAuth Web Server Flow”
In order for &money to call in via this connected app, it may be necessary to add the &money backend IP range to Network Access/profile
- Go to Security -> Network Access
- Add &money backend IP range to Trusted IP Ranges (See provided data sheet)
Allow users to relate multiple contacts to tasks and events
In order for advisors to be able to book customer meetings with multiple participants in the future, it is important that Shared activities is enabled on the environment. This can be done via activity settings.
- Go to “Feature Settings -> Sales -> Activity Settings”
- Enable “Allow Users to Relate Multiple Contacts to Tasks and Events”
Note - this feature can not be disabled once enabled.