Playbooks User Guide
This guide walks you through creating, configuring, and managing playbooks using the visual editor in the &Money Management UI.
Getting Started
Prerequisites
- Admin access to the Management UI
- An understanding of the business workflow you want to automate
- Any required resources already configured: AI capabilities, entity patterns, templates, and portals
Accessing Playbooks
- Log in to the Management UI
- Click Admin in the left sidebar
- Select Playbooks from the admin menu
The Playbooks page shows all existing playbooks with their names, block counts, and action buttons.
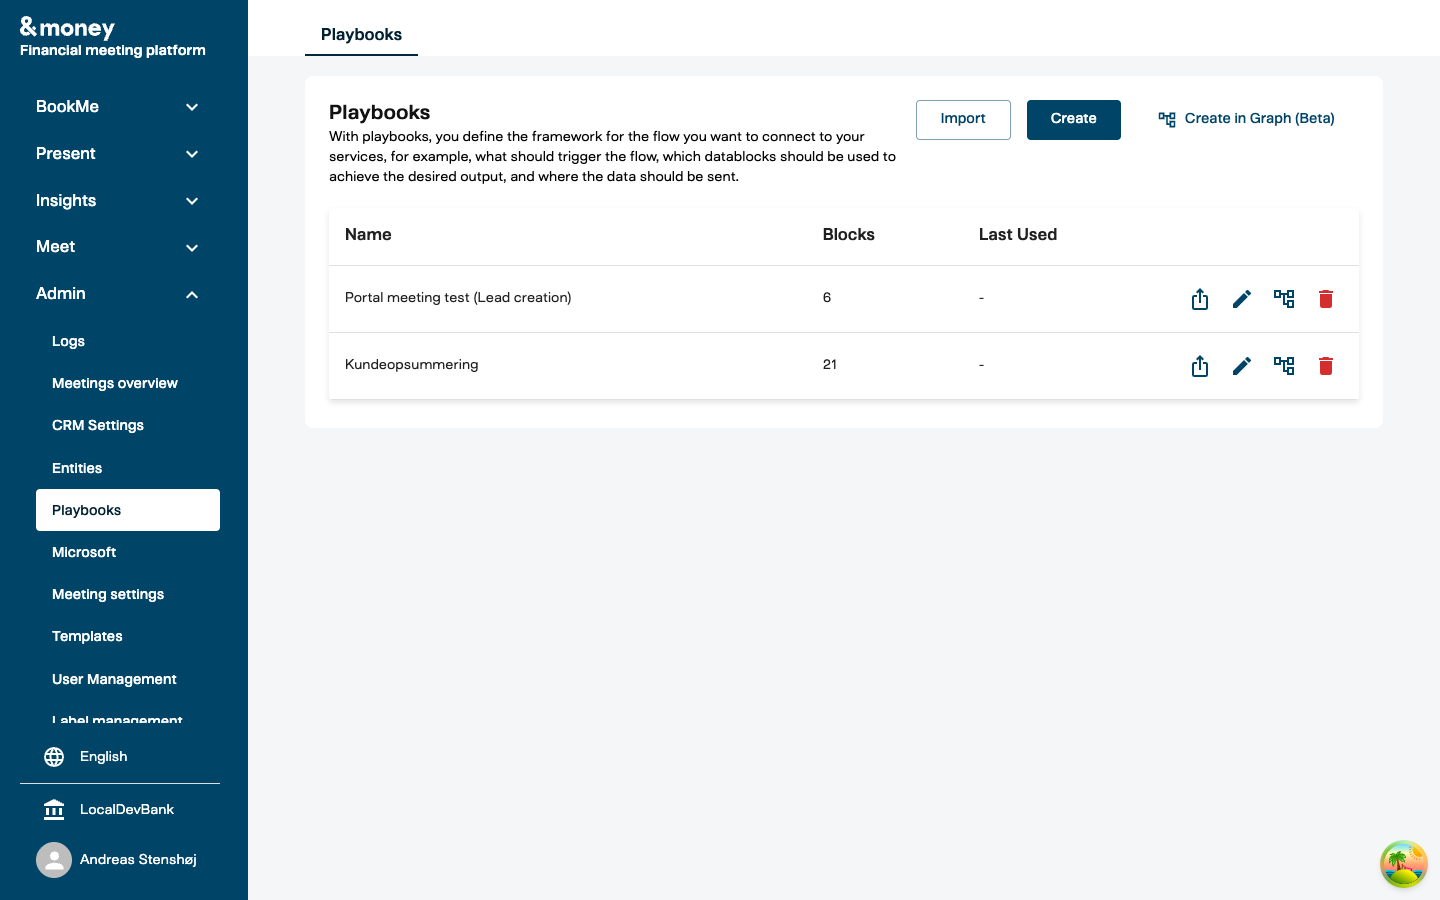
From here you can:
- Create in Graph — build a new playbook in the visual editor
- Edit in Graph — open an existing playbook in the visual editor
- Export — download a playbook as JSON for backup or transfer
- Import — upload a previously exported playbook
- Delete — permanently remove a playbook
The Visual Editor
The visual editor displays your playbook as an interactive graph. Blocks appear as nodes, and data connections appear as edges between them.
Editor Layout
| Area | Location | What it does |
|---|---|---|
| Toolbar | Top | Playbook name, Import, Export, Add block, Validate, and Save |
| Canvas | Center | The interactive graph where you build your workflow |
| Canvas controls | Bottom-left | Zoom in/out, Fit view, Toggle interactivity, Auto-layout |
| Minimap | Bottom-right | Overview of the entire graph for quick navigation |
Canvas Navigation
| Action | How |
|---|---|
| Pan | Click and drag on empty canvas space |
| Zoom | Scroll wheel, or use the +/- buttons |
| Fit view | Click the fit-view button to zoom to show all blocks |
| Auto-layout | Click the auto-layout button to automatically arrange the graph |
Keyboard Shortcuts
| Shortcut | Action |
|---|---|
| Ctrl+S / Cmd+S | Save the playbook |
| Delete / Backspace | Delete the selected block |
Creating a Playbook from Scratch
Step 1: Open the Editor
Click “Create in Graph” on the Playbooks page. A new editor opens with a single Trigger block and suggested next blocks below it.
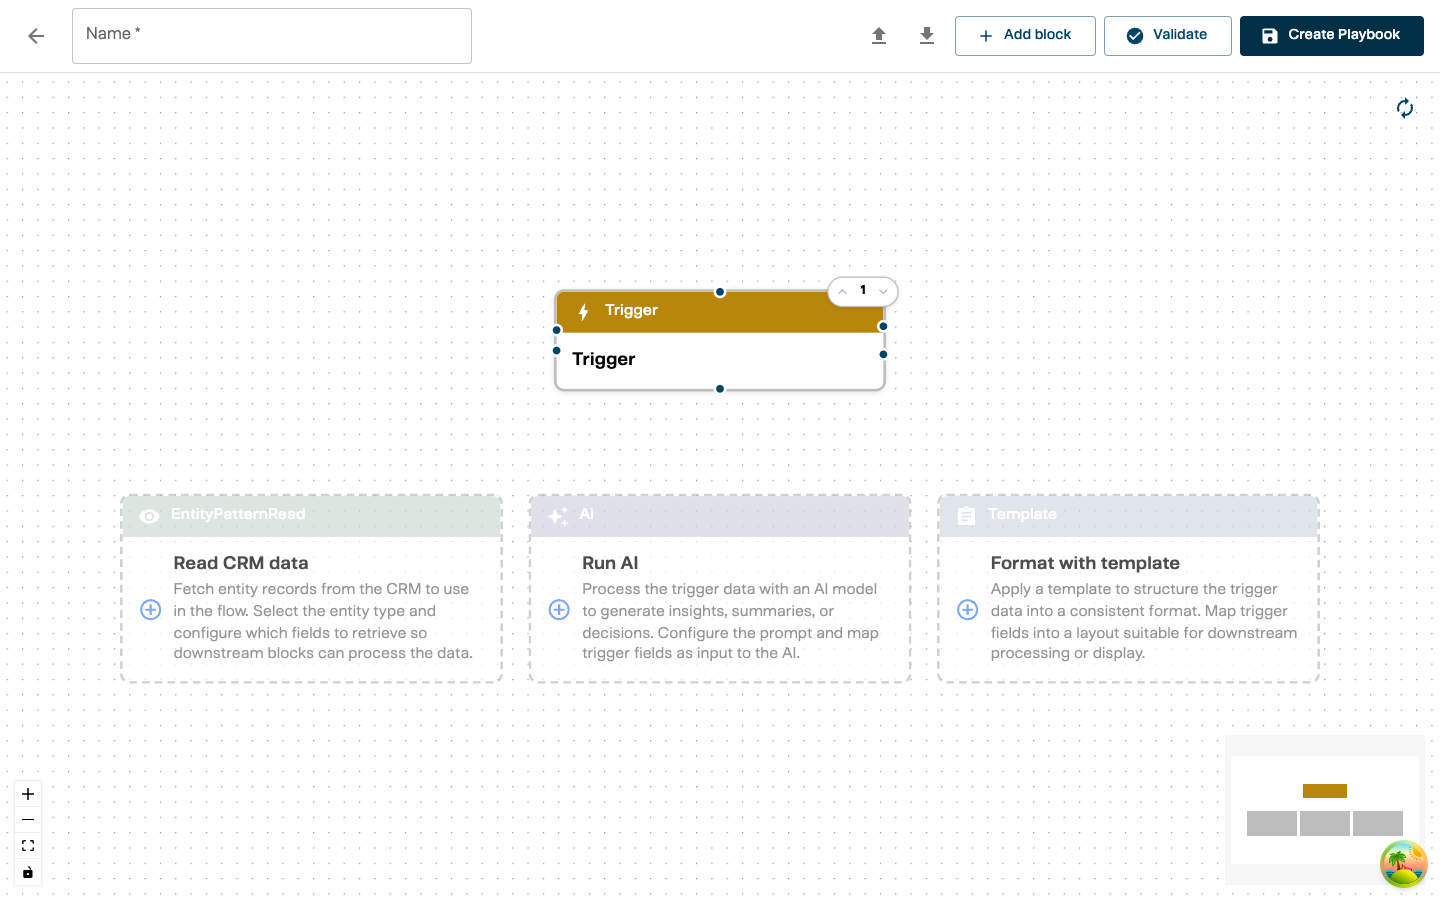
The suggestions show common block types you might add after the trigger — click one to add it directly, or use the ”+ Add block” button in the toolbar.
Step 2: Name Your Playbook
Enter a clear, descriptive name in the Name field at the top — for example, “Portal Meeting — Lead Creation” or “Customer Overview Report”.
Step 3: Configure the Trigger
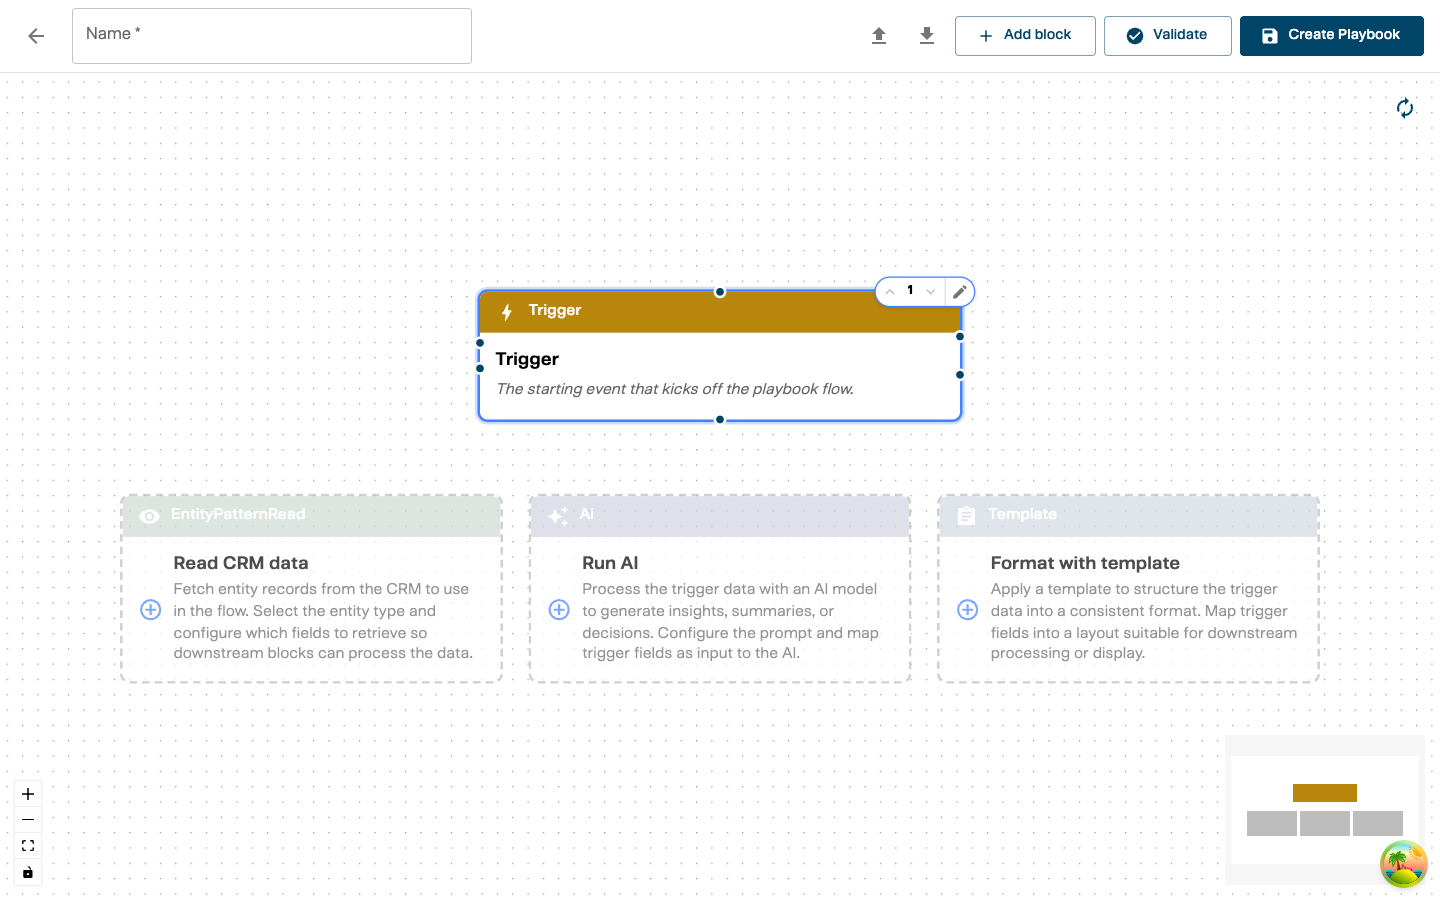
Click the Trigger block to expand it and reveal the configuration form.
- Trigger Type — select the event that starts the playbook:
- PortalMeetings — fires when a customer books a meeting through a BookMe portal
- PortalMeetingCancelled — fires when a portal meeting is cancelled
- CustomerOverview — fires when a customer overview report is requested
- TranscriptReady — fires when a recorded meeting’s transcript becomes available
- MeetMeetingEnded — fires when an &Money Meet video meeting ends
- Name — give the trigger a descriptive name (e.g., “Portal Meeting Trigger”)
- Portal selection (PortalMeetings and PortalMeetingCancelled only) — choose which portals this playbook responds to. If none are selected, it responds to all portals.
The trigger block determines what data is available to the rest of the playbook. A PortalMeetings trigger provides meeting details (title, dates, advisor info, attendees, theme, customer category, custom fields), while a CustomerOverview trigger provides only an account ID. A TranscriptReady trigger provides the transcript content, meeting ID, and transcript ID. Use the Relation Builder to explore exactly which fields are available for each trigger type.
Step 4: Add a Block
Click ”+ Add block” in the toolbar. A new Untyped block appears below the existing blocks on the canvas.

The new block shows “Untyped” in its header and “Unnamed block” as its name. The number badge (2 in this example) shows its position in the execution order — blocks run top to bottom.
You can also add blocks by clicking one of the suggestion cards that appear below blocks on the canvas. These suggest common next steps (e.g., “Filter results”, “Run AI”, “Format with template”) and add a pre-typed block directly.
Step 5: Select the Block Type
Click the new block to select it. The block automatically enters edit mode, showing a configuration form with:
- Block type — a required dropdown to choose what this block does
- Name — a descriptive label for this block
Click the Block type dropdown to see the available types:
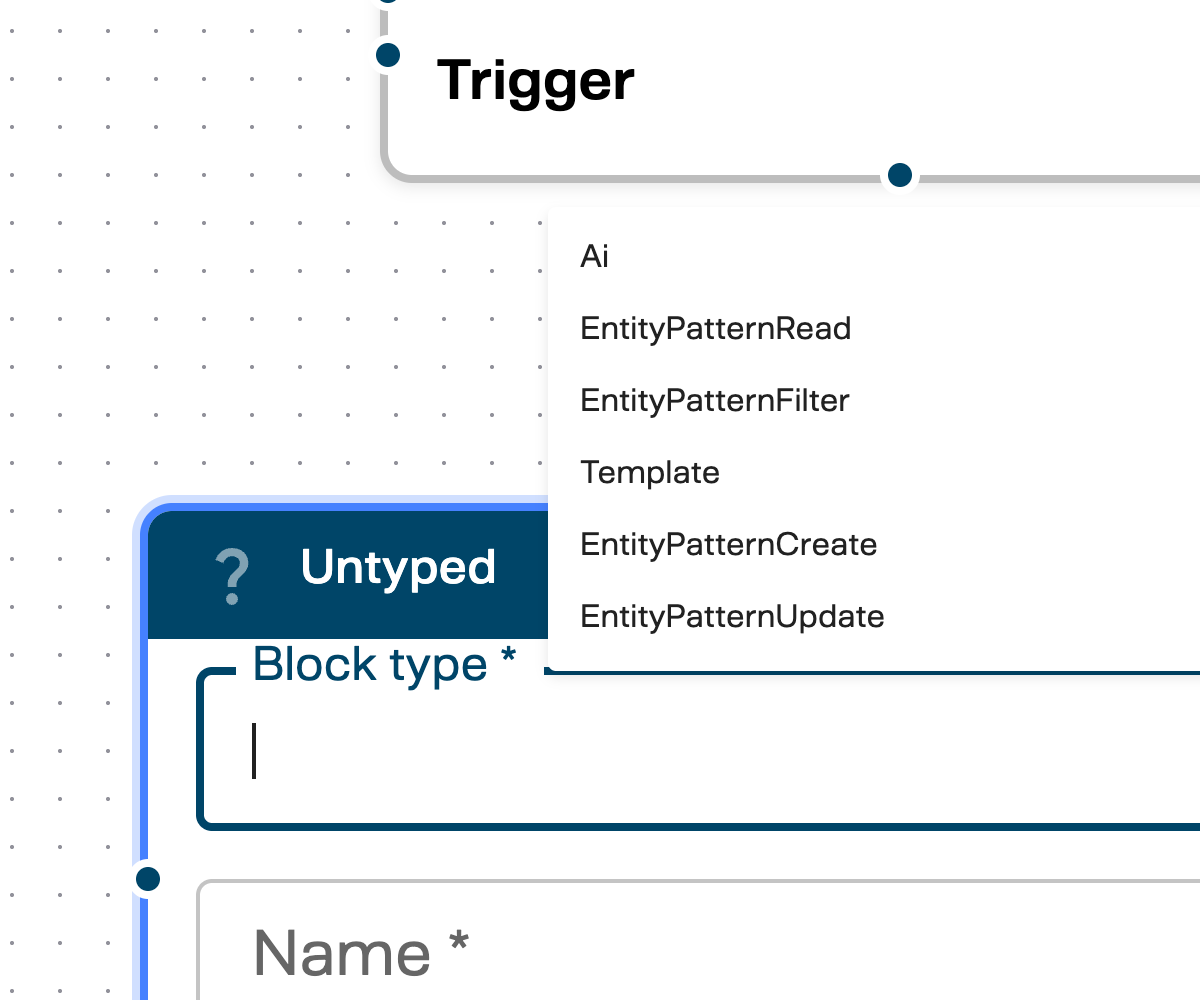
| Block Type | What it does |
|---|---|
| Ai | Send data to an AI capability for processing (summarization, extraction, classification, etc.) |
| EntityPatternRead | Fetch records from the CRM using a configured entity pattern |
| EntityPatternFilter | Add filter conditions (e.g., “where email equals X”) for CRM queries |
| Template | Format data into a structured output using a predefined template |
| EntityPatternCreate | Create a new record in the CRM |
| EntityPatternUpdate | Update an existing CRM record |
After selecting a type, a Value dropdown appears where you choose the specific resource — for example, which AI capability, which entity pattern, or which template this block should use.
Fill in all three fields:
- Block type — e.g., EntityPatternRead
- Value — e.g., Advisors (the entity pattern to query)
- Name — e.g., “Read Advisor”
Click the green checkmark in the block header to confirm and exit edit mode. Click the pencil icon to re-enter edit mode later.
Step 6: Connect Blocks
Connections define how data flows between blocks. There are two ways to create a connection:
Option A — Drag between handles: Each block has small connection handles (dots) on its edges. Click and drag from a source handle on one block to a target handle on the destination block. The editor validates the connection as you drag — you can only connect forwards (source must be earlier in the execution order) and you cannot connect to the Trigger block.
Option B — Use the “Connect from…” button:
- Click the destination block (the block that needs data) to select it
- In the INPUTS section at the bottom of the block, click “Connect from…“
- A dropdown menu lists all blocks earlier in the flow — select the source block
Both methods produce the same result:
A dashed edge appears between the two blocks with a “Click to configure” label. This means the connection exists but has no field mappings yet — the next step is to map which specific data fields flow through this connection.
A block can receive data from multiple source blocks. For example, an EntityPatternCreate block might pull the meeting title from the Trigger and the advisor ID from an EntityPatternRead block. Drag another connection or click “Connect from…” again to add another source.
Step 7: Map Fields Between Blocks
Each connection can carry multiple field mappings — individual data paths from the source block to the destination block. When you expand a connection group, you see the mapping rows:
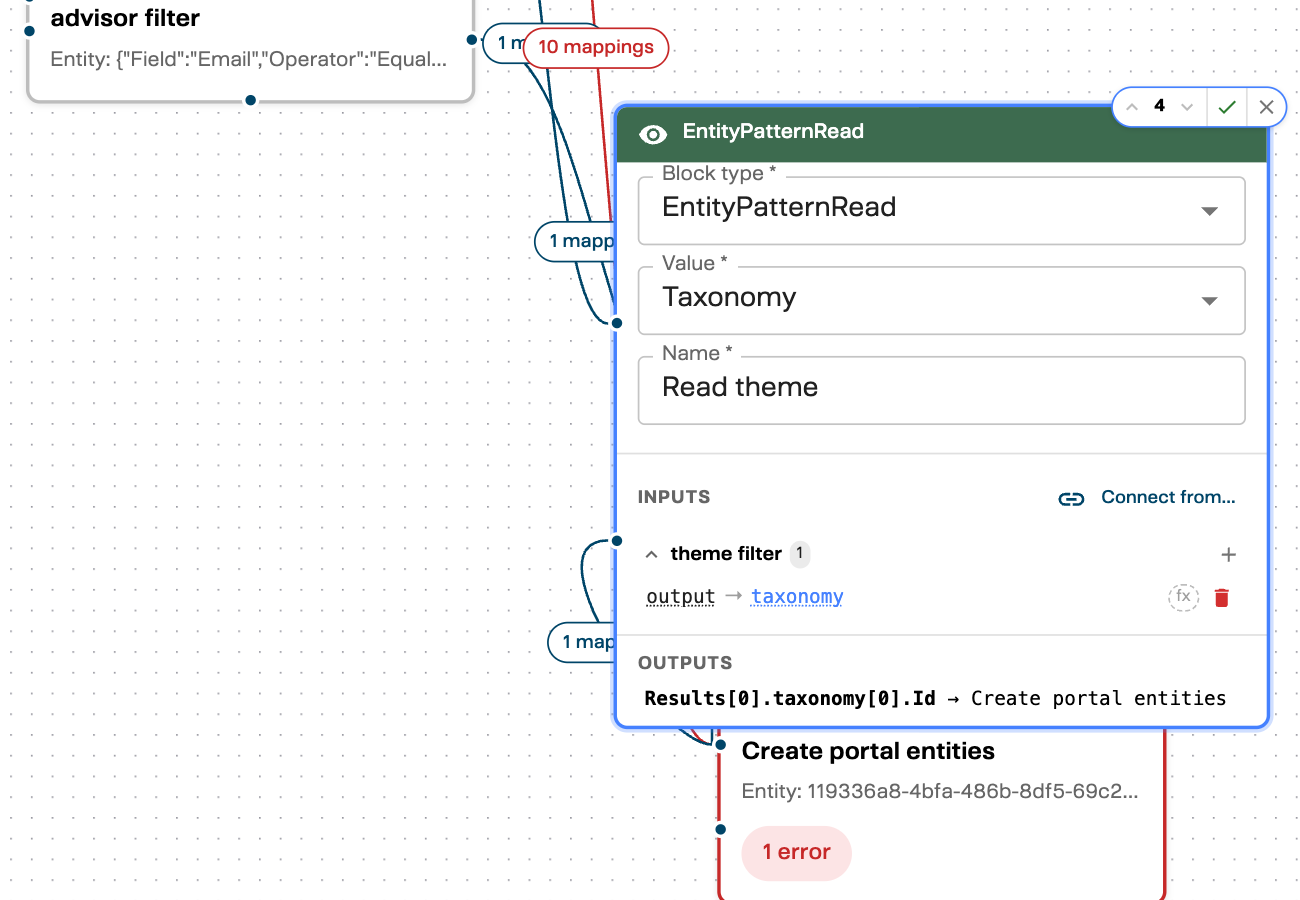
In this example, the “Read theme” block has:
- INPUTS — a connection from “theme filter” with 1 mapping:
output → taxonomy - OUTPUTS — data flowing to “Create portal entities”:
Results[0].taxonomy[0].Id
To add a field mapping:
- Click a connection group name (e.g., “theme filter”) to expand it
- Click the + button to add a new mapping row
- Each mapping row has these controls:
| Icon | What it does |
|---|---|
| Pencil (source) | Open the Relation Builder to pick the source field |
| Pencil (destination) | Open the Relation Builder to pick the destination field |
| fx | Add data transformations to this mapping |
| Trash | Remove this mapping |
To pick a field using the Relation Builder:
Click the pencil icon on a source or destination field. The Data relationship builder modal opens:
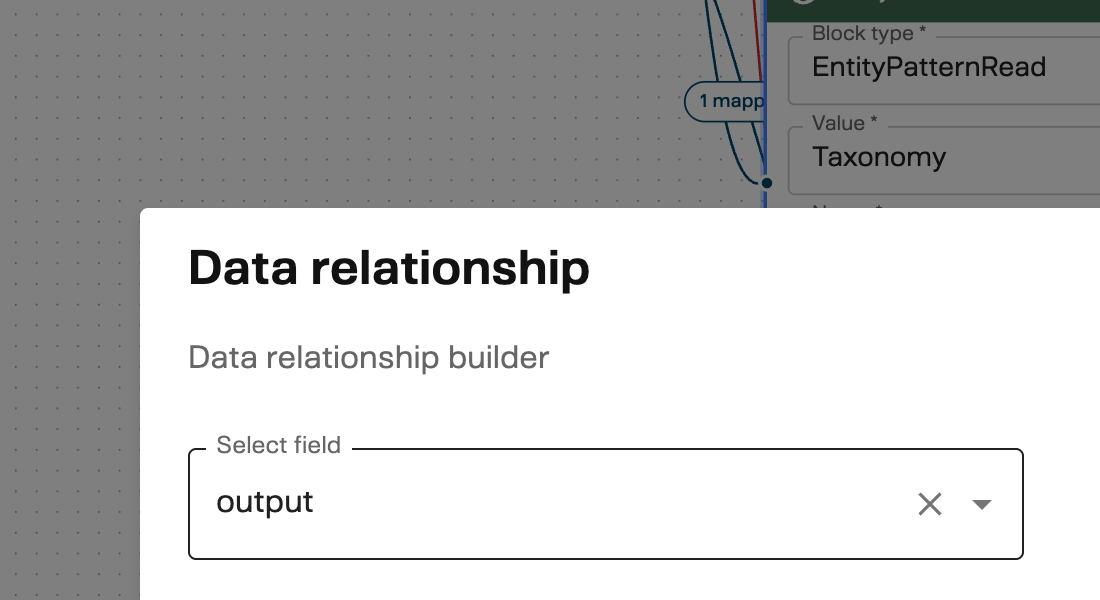
- Use the Select field dropdown to browse the available fields from the source block
- For nested objects, the dropdown updates to show child fields as you drill deeper
- For array fields, choose First (selects item
[0]) or All (selects every item) - Click Save to apply the selected field path
The builder generates a dot-notation path like Meeting.ExternalAttendees[0].Email — you don’t need to type these paths manually.
Connection edges on the canvas show how many mappings each connection carries:
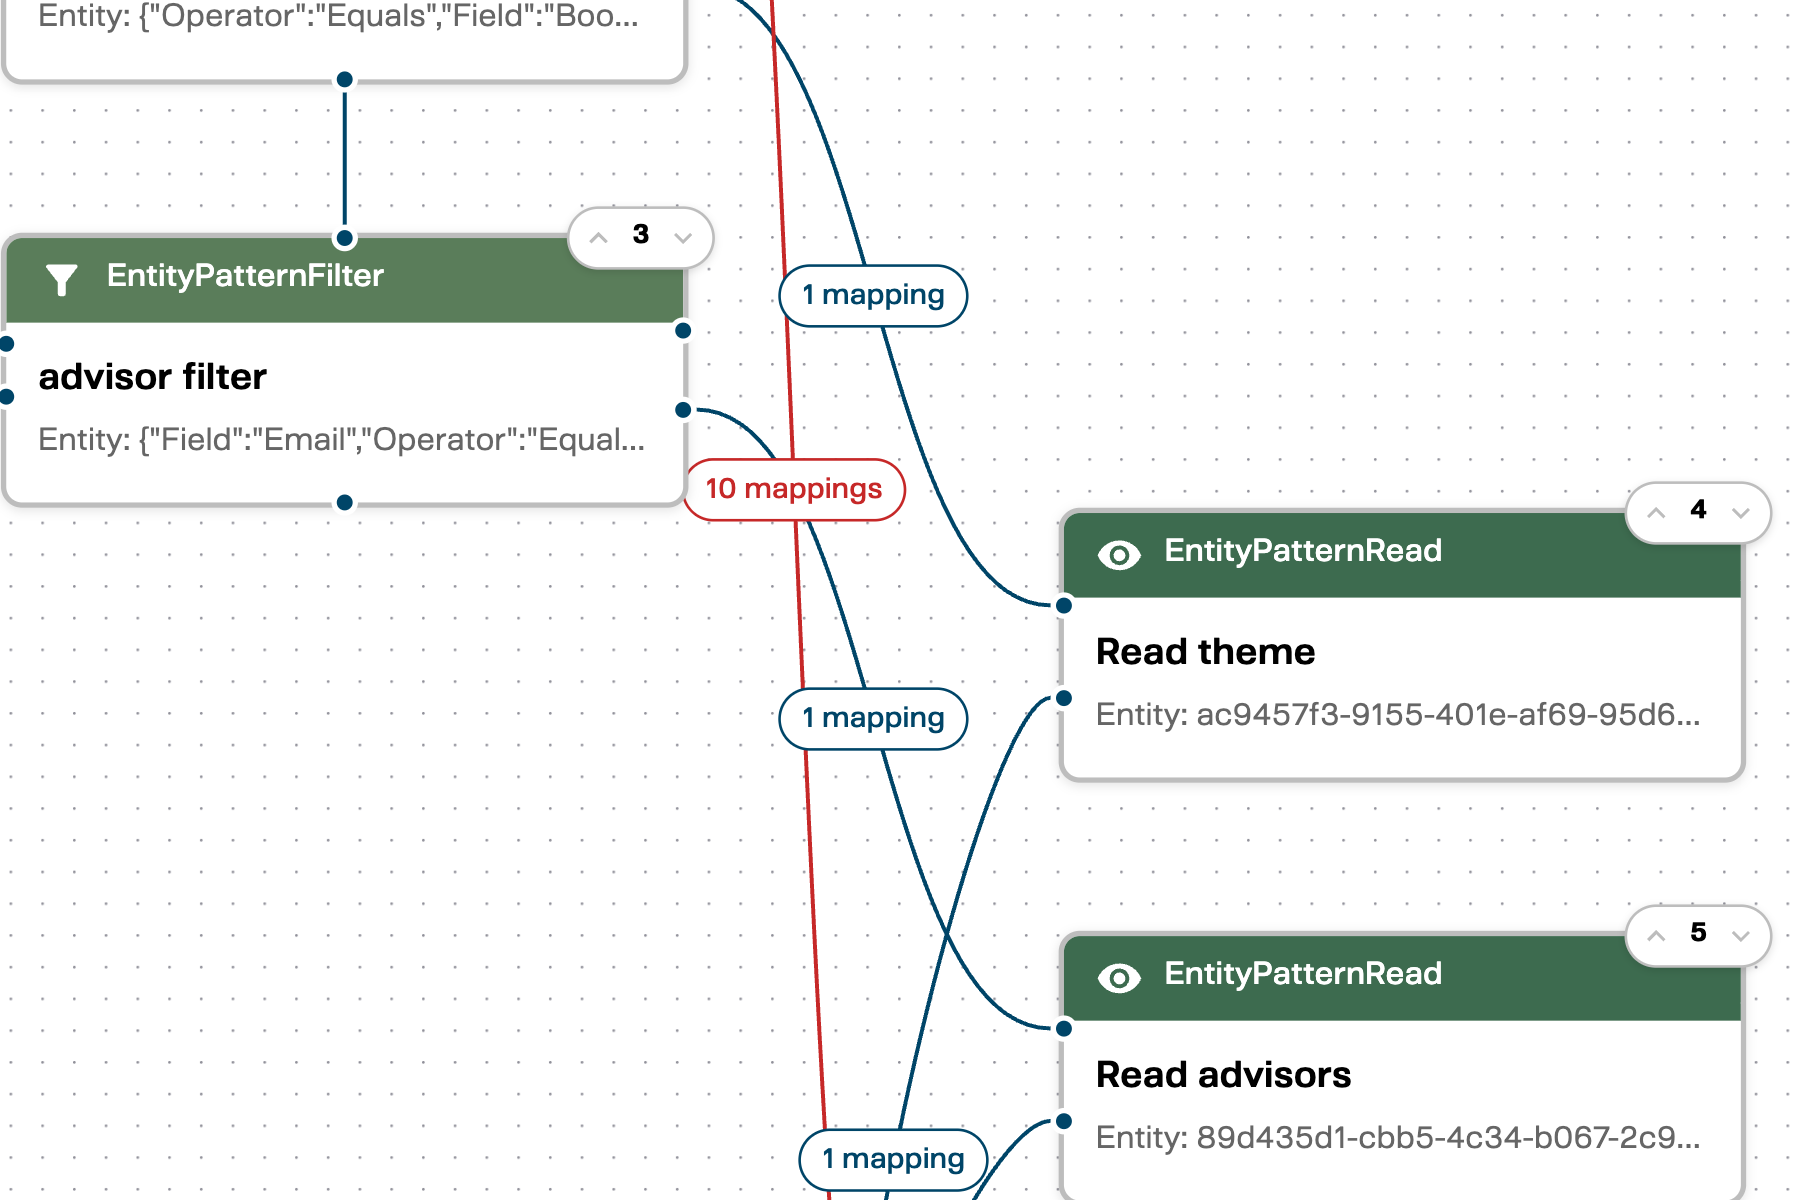
Labels like “1 mapping” or “10 mappings” appear on the connection edges, giving you an at-a-glance view of how much data flows between blocks.
Step 8: Add Transformations (Optional)
Transformations modify data as it passes through a mapping. You can chain multiple transformations — each one receives the output of the previous.
To add a transformation:
- Expand a connection group and locate a mapping row
- Click the fx button on the mapping row
- Select the transformation type from the dropdown
Available transformation types:
| Type | Input | What it does | Example |
|---|---|---|---|
| Identity | Any | Passes data through unchanged | Direct field-to-field copy |
| Extract | Object | Picks a single value using a dot-path | Meeting.Title → "Q1 Review" |
| Project | Object | Keeps only selected fields | Name, Email → drops Phone, Address |
| Join | Array | Combines items into a string | ["A","B","C"] → "A, B, C" |
| Split | Text | Divides a string into an array | "a@x.com, b@x.com" → ["a@x.com","b@x.com"] |
| Serialize | Object | Converts to JSON text | {Name:"Jane"} → '{"name":"Jane"}' |
| Base64Decode | Text | Decodes Base64 to plain text | "SGVsbG8=" → "Hello" |
Transformations have compatibility rules. Extract and Project require an object as input. Join works on arrays. Split and Base64Decode work on text. The editor shows warnings if you chain incompatible types.
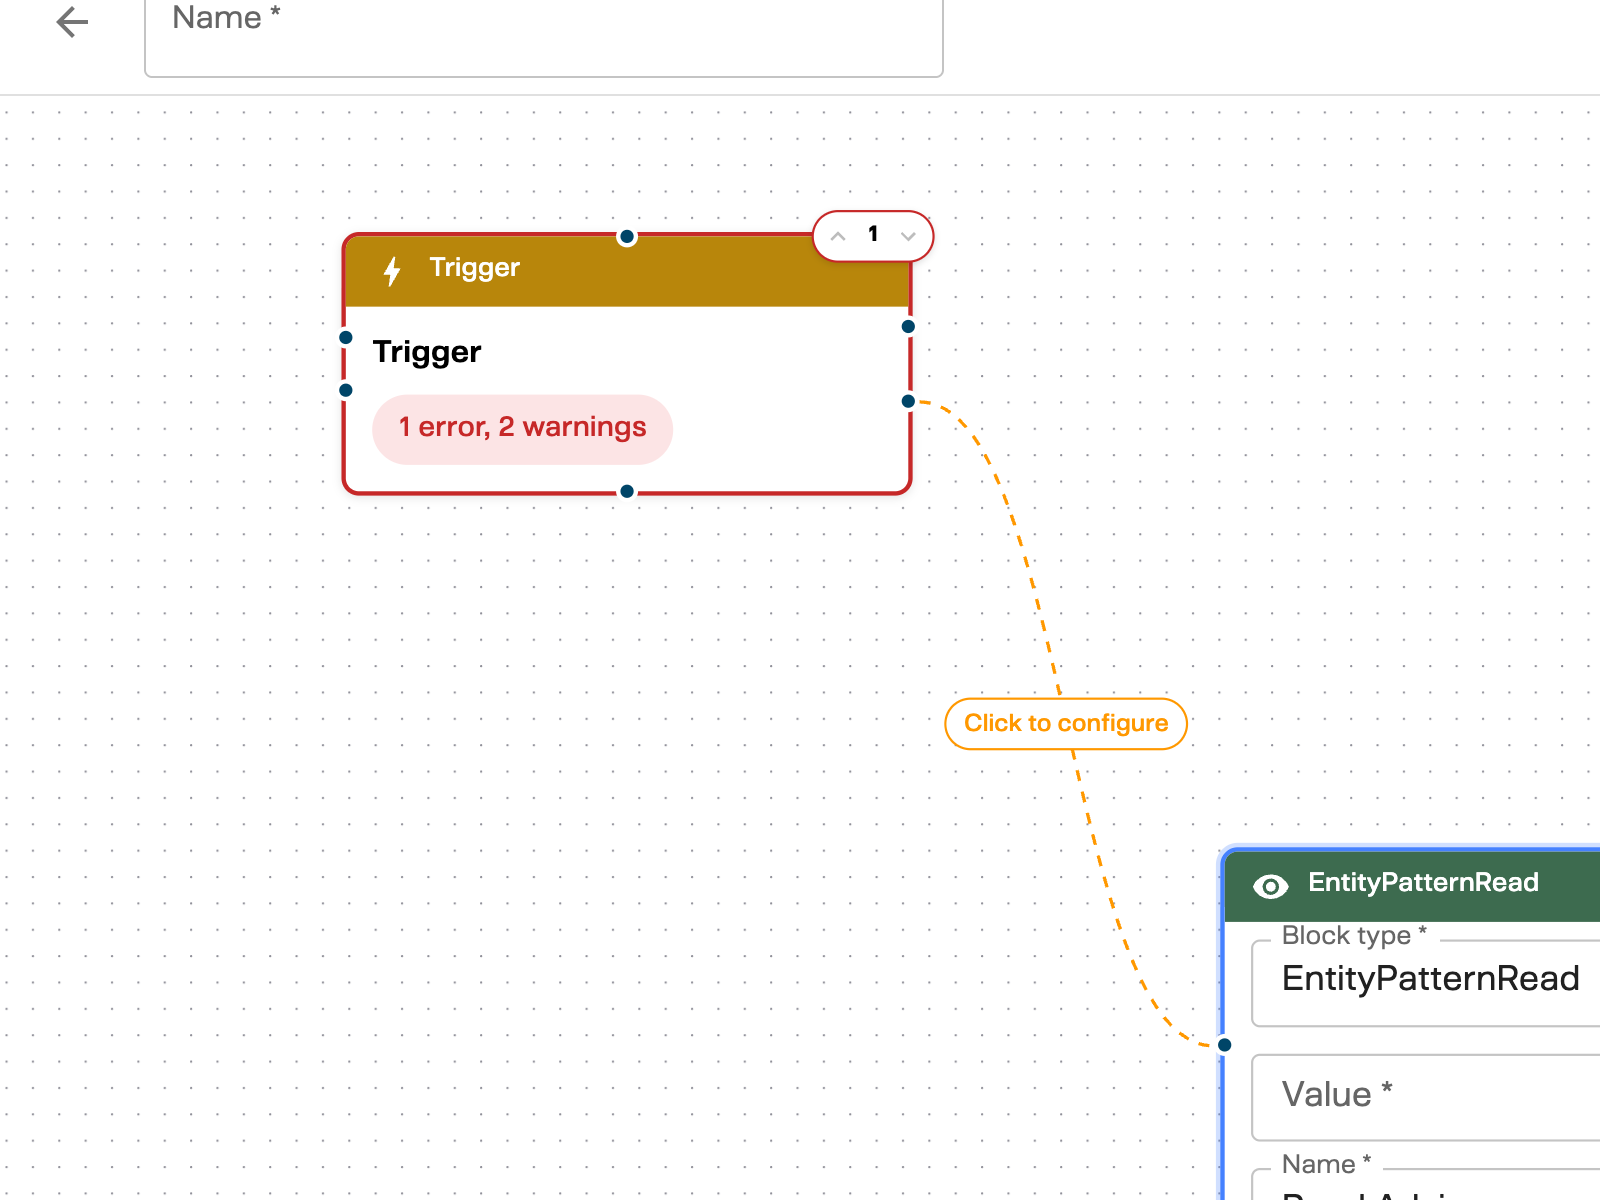
Step 9: Validate
Click “Validate” in the toolbar to check your playbook for issues.
The validator checks for:
- Missing required fields (block type, block value, name)
- Invalid or incomplete relations
- Configuration errors
After validation:
- Green badges — the block passed validation
- Red badges with an error count — issues that must be fixed
- Edge styling — problematic connections are highlighted
All validation errors must be fixed before you can save. The Save button automatically runs validation and will not proceed if there are errors.
Step 10: Save
Click “Save” (or press Ctrl+S / Cmd+S). For new playbooks, the button reads “Create Playbook”.
The editor stays open after saving, so you can continue editing.
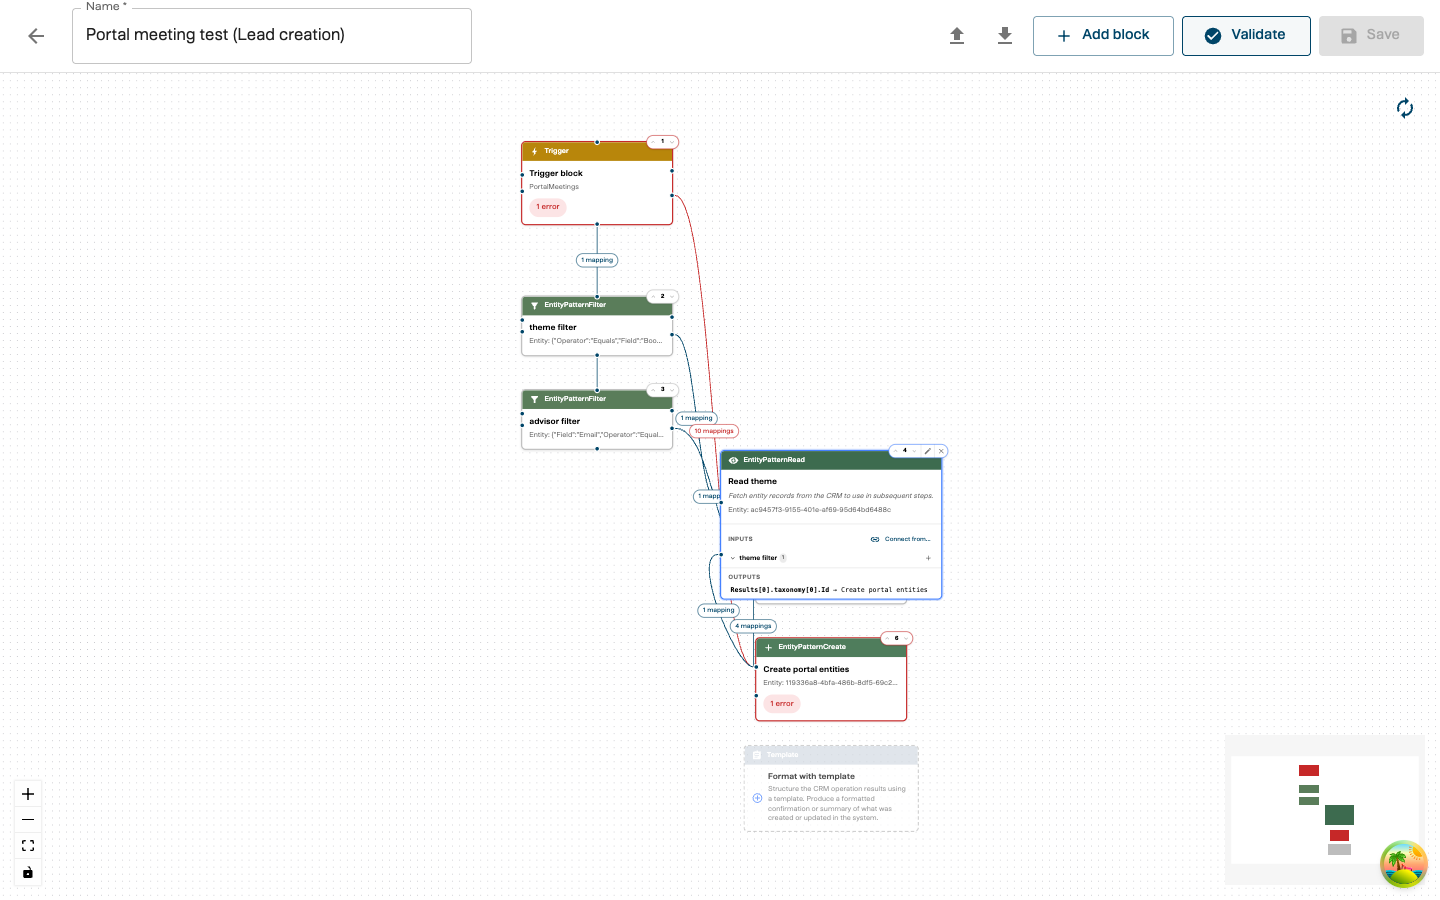
Real-World Example: Portal Meeting Lead Creation
This example walks through building a playbook that automatically creates a CRM lead record when a meeting is booked through a portal.
The workflow
Portal meeting booked
  → Trigger (PortalMeetings)
  → EntityPatternFilter (filter by booking ID)
  → EntityPatternRead (fetch advisor data)
  → EntityPatternCreate (create lead in CRM)
Step-by-step
-
Create a new playbook and name it “Portal Meeting — Lead Creation”
- Configure the trigger:
- Trigger Type: PortalMeetings
- Name: “Portal Meeting Trigger”
- Select the portal(s) this should apply to
- Add an EntityPatternFilter block:
- Name: “Filter by Booking ID”
- Value: Configure with Field:
BookingId, Operator:Equals, Value:placeholder - This filter will be used by the read block to find the right record
- Add an EntityPatternRead block:
- Name: “Read Advisor”
- Value: Select the advisor entity pattern
- Add an input relation from the Trigger block:
- Source field: use the Relation Builder to navigate to
Meeting.MeetingOwner.Email - Destination field: the email search parameter
- Source field: use the Relation Builder to navigate to
- This fetches the advisor’s CRM record using the email from the trigger data
- Add an EntityPatternCreate block:
- Name: “Create Lead”
- Value: Select the lead entity pattern
- Add input relations from both the Trigger and Read Advisor blocks:
- Map meeting title, dates, and attendee info from the trigger
- Map the advisor’s CRM ID from the read block
- Validate and save
How the portal connection works
When a customer books a meeting through a BookMe portal:
- The portal fires a PortalMeetings event containing all meeting details
- The playbook engine matches the event to playbooks whose trigger type is
PortalMeetingsand whose portal selection includes that portal - The trigger block receives the meeting data and makes it available as output fields
- Downstream blocks pull the data they need via relations — for example, extracting
Meeting.MeetingOwner.Emailto look up the advisor in the CRM - The playbook executes blocks in order, with each block able to use data from any previous block
The data available from a portal trigger depends on the portal’s configuration. Use the Relation Builder to explore exactly which fields are available — it dynamically fetches the field structure from the server based on your trigger type and selected portals.
Real-World Example: Customer Overview with AI
This example shows a more complex playbook that gathers CRM data, runs AI analysis, and produces a formatted report.
The workflow
Customer overview requested
  → Trigger (CustomerOverview)
  → EntityPatternRead (fetch opportunities)
  → EntityPatternRead (fetch interactions)
  → EntityPatternRead (fetch cases)
  → AI (analyze and summarize)
  → Template (format report)
  → EntityPatternCreate (store report)

Key patterns in this playbook
Multiple parallel reads: Several EntityPatternRead blocks all pull from the trigger’s account ID but query different CRM entities (opportunities, interactions, cases). They all receive data from the same trigger block.
AI processing: The AI block receives data from multiple read blocks. Its input relations use Project transformations to select only the fields the AI capability needs, keeping the payload focused.
Template formatting: The Template block takes the AI output and structures it into a human-readable format using a predefined template.
Final storage: An EntityPatternCreate block saves the finished report back to the CRM, linking it to the customer’s account.
Editing an Existing Playbook
- From the Playbooks list, click “Edit in Graph” on the playbook
- The editor loads all blocks and connections onto the canvas
- Click any block to expand and modify it
- Add, remove, or reconnect blocks as needed
- Click Save when finished
If you have unsaved changes and try to leave the editor, you’ll be asked whether to save, discard, or cancel.
Managing Blocks
Reordering Blocks
Blocks execute in the order shown (top to bottom). To change execution order:
- Click a block to select it
- Use the up/down arrow buttons next to the block’s order number
The Trigger block must always remain at position 1 and cannot be moved.
Deleting Blocks
- Click a block to select it
- Click the delete icon on the block header, then confirm with “Delete?”
Or select a block and press Delete / Backspace.
When a block is deleted, all its relations (incoming and outgoing) are automatically cleaned up.
Import and Export
Exporting
- Open a playbook in the editor
- Click the Export button (down-arrow icon) in the toolbar
- Copy the JSON or download it
Exports are fully portable — they include all block configurations, relations, transformations, and resource definitions (templates, entity patterns). You can use exports to transfer playbooks between environments or as backups.
Importing
- Click the Import button (up-arrow icon) in the toolbar
- Paste the exported JSON
- Click Import
In create mode (new playbook): The import replaces the current canvas entirely.
In edit mode (existing playbook): Imported blocks are appended after existing blocks. Their internal connections are cleared — reconnect them to the existing flow using the relation tools.
Import automatically handles resource provisioning. If the imported playbook references templates, entity patterns, or AI capabilities that don’t exist in the target environment, the import endpoint creates them based on the embedded resource definitions.
AI Block: Capability Versions
AI capabilities can have multiple versions. When configuring an AI block:
- Default — uses the latest version (recommended for most cases)
- Specific version — pin a particular version to ensure consistent behavior even when a newer version is released
The version selector appears after you choose an AI capability that has multiple versions available.
Tips and Best Practices
Planning
- Define the goal first — what should the playbook accomplish?
- Identify data sources — what CRM entities, AI capabilities, and templates are needed?
- Sketch the flow — map out which blocks connect to which before building
Building
- Name blocks clearly — “Read Advisor by Email” is better than “EntityPatternRead 1”
- Start simple — get a minimal flow working, then add complexity
- Validate often — run validation after adding blocks or relations to catch issues early
- Use auto-layout — keeps the graph readable as it grows
Performance
- Minimize CRM queries — each EntityPatternRead is a network call; combine where possible
- Use filters — EntityPatternFilter blocks reduce the data volume early in the flow
- Keep transformation pipelines short — only transform data that actually needs modification
Related Documentation
- Introduction to Playbooks — concepts, block types, and transformation reference
- Playbooks Integrations — AI, CRM, and template integration details
- Portal Configuration — setting up the portals that trigger playbooks