SCIM Provisioning Setup
This guide explains how to add users to your SCIM provisioning setup in Microsoft Entra after your app registration and service principals have been configured by your automation script. When users are assigned to the SCIM-enabled enterprise application, the SCIM synchronization process is triggered so that user accounts are created or updated in your target system.
This guide does not cover the underlying script that sets up the app registration and service principals. It assumes those steps have already been completed.
{style=”info”}
Navigating to the Enterprise Application
-
Sign In:
Log in to the Microsoft Entra admin portal with an account that has sufficient privileges (e.g., Global Administrator, Application Administrator, or Cloud Application Administrator). -
Locate Your Application:
- In the left-hand menu, select Enterprise Applications.
- Find and click on the SCIM-enabled enterprise applications that were configured by your script.
- There should be one application that handles rooms and one that handles advisors.
Application configuration and attribute mapping
- Configure Provisioning Settings:
- To configure the enterprise application for SCIM provisioning, select your enterprise application for either Advisors or Rooms and go to:
Provisioning --> Edit Provisioning --> Admin Credentials
- To configure the enterprise application for SCIM provisioning, select your enterprise application for either Advisors or Rooms and go to:
Here you should set up the appropriate &Money Tenant URL provisioning endpoint depending on environment and resource provisioning type along with their associated secret token(s):
| Environment/Resource | Tenant URL: Advisors | Tenant URL: Rooms |
|---|---|---|
| Test | https://api.test-env.booking.andmoney.dk/advisors/scim |
https://api.test-env.booking.andmoney.dk/rooms/scim |
| Production | https://api.booking.andmoney.dk/advisors/scim |
https://api.booking.andmoney.dk/rooms/scim |
The Secret Token is provided by &Money.
- Attribute mapping:
- Configuration of attribute mappings should be done for both the advisor and room enterprise applications. To configure these, go to: ` Provisioning –> Edit Provisioning –> Mappings –> Provision Azure Active Directory Users `
The attribute mappings for advisors should look like the table below:
| Customappsso Attribute | Microsoft Entra ID Attribute |
|---|---|
| active | Switch([IsSoftDeleted], , “False”, “True”, “True”, “False”) |
| userName | userPrincipalName |
| displayName | displayName |
| name.givenName | givenName |
| name.familyName | surname |
| addresses[type eq “work”].formatted | physicalDeliveryOfficeName |
| externalId | objectId |
Attribute mappings for rooms should look like the table below:
| Customappsso Attribute | Microsoft Entra ID Attribute |
|---|---|
| active | Switch([IsSoftDeleted], , “False”, “True”, “True”, “False”) |
| userName | userPrincipalName |
| displayName | displayName |
| addresses[type eq “work”].formatted | physicalDeliveryOfficeName |
| externalId | objectId |
Assigning Users to the Application
-
Access the Users and Groups Blade:
From the application’s overview page, click on the Users and groups section. - Add Users or Groups:
- Click the Add user button.
- In the Add Assignment panel, click Users and groups to display available directory users and groups.
- Select one or more users/groups you wish to provision.
- Click Select to add them to the assignment list.
- Finalize the Assignment:
Click Assign to confirm. Once assigned, these users will be included in the next provisioning cycle.
For additional details on assigning user or group access in Entra, refer to Assign user or group access to an enterprise application.
Triggering and Verifying the Provisioning Sync
- Automatic Synchronization:
- Microsoft Entra’s provisioning service automatically runs on a schedule (typically every 40 minutes).
- Once the sync occurs, the assigned users are provisioned (or updated) in the target system.
- Manual Provisioning (Optional):
If you need to expedite provisioning for a specific user:- Navigate to the Provisioning blade of your enterprise application.
- Use the Provision on demand feature:
- Search for the newly assigned user.
- Click Provision for that user to force an immediate sync.
- Verification:
- In the Entra Portal:
Check the provisioning logs under the Provisioning blade for confirmation that the user has been created or updated. - In the Target System:
Log in to your target system (the one connected via SCIM) and verify that the new user account appears with the correct attributes.
- In the Entra Portal:
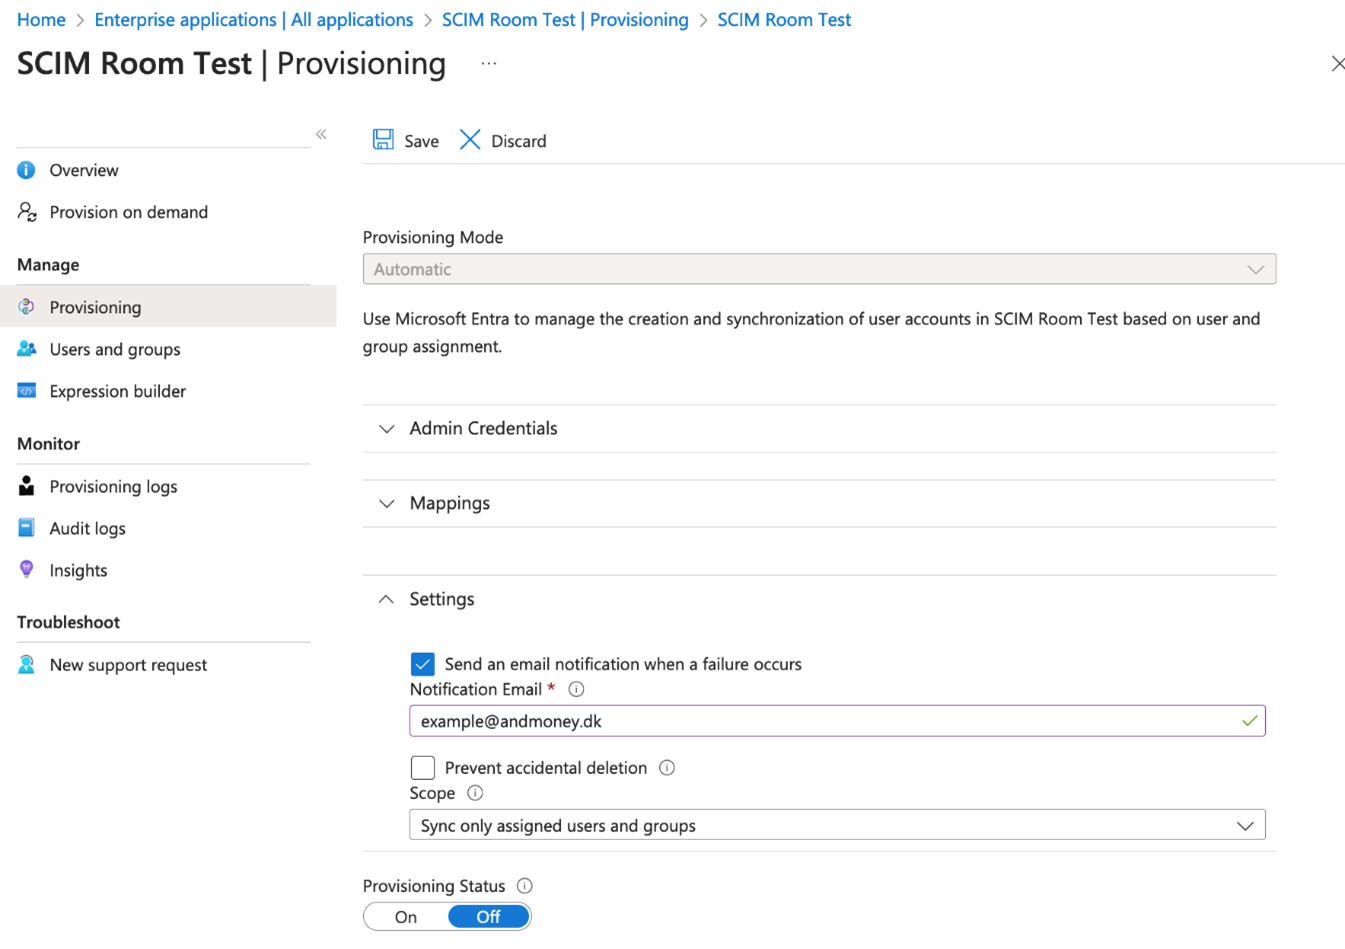
Monitoring
To Monitor that the SCIM provisioning is working as intended continuously it is possible to configure an email address to notify when failure occurs. To do this:
- Go to Enterprise Application –> Provisioning –> Settings –> Enable Send Email
This will need to be configured for each Enterprise Application Registration that needs to be monitored. More Advanced monitoring scenarios can be achieved by integrating the Enterprise Application Registrations with Azure Log Analytics.
SCIM Provisioning Setup References
For further guidance on SCIM provisioning setup, please see these Microsoft documentation pages:
-
Assigning Users:
Assign user or group access to an enterprise application -
Attribute Mapping:
Customize application attributes